

Nik & Trick's Analogue Photography Blogs
Nik & Trick’s Fuss Free Guide to Film Processing…The Easier Way to Develop Your Own Films Without Worry!

Nov
So you’ve decided that it’s time to take that step…to discover the joy of developing your own films at home…
So you go on the internet…and gee, isn’t there some stuff out there??
Much of it serving only to put you off…telling you it’s SO difficult, or confusing, contradictory and even misleading!
Well, push that stuff aside because in reality, home processing is very very easy, your Gran might even have done at home, you see, back in the day many did so why not you?
Here at Nik & Trick, we can’t be doing with any fuss…
What follows is what I was taught as young boy and have used ever since…so stick to the following basic and Fuss Free Guide and you’ll be alright!
So let’s get going…
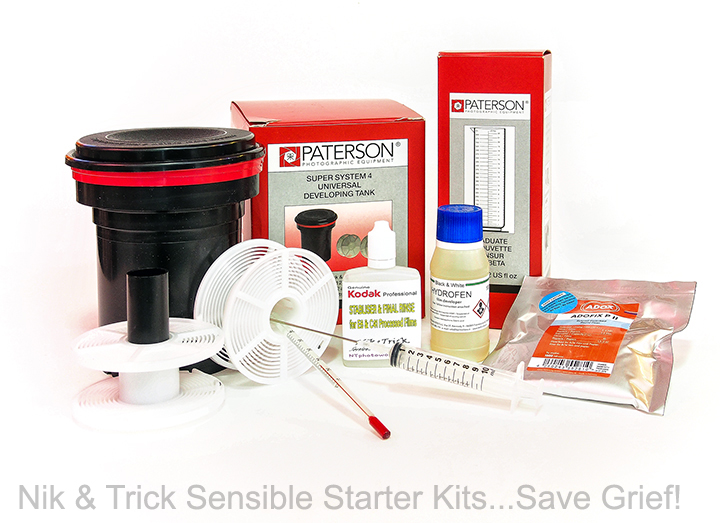
If you haven’t already got the hardware, then everything you’ll need apart from darkness is supplied in one of our great value sensible starter kits…
There are a couple to chose from and unlike other starter kits, many of which offer just a dribble to appear cheaper 😉 our kits are supplied with a full load of the best quality chemistry, usually by BelliniFoto or Kodak.
A blacked out room makes life easier but if you haven’t one then one of our darkbags will be just fine and dandy..that and a sink and you’re off!
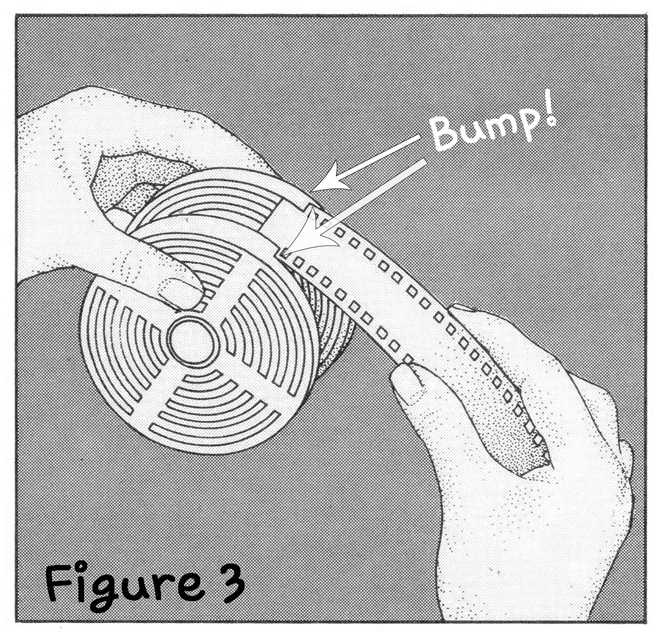
First of all comes the hardest part of the whole exercise…Feel for Bump!
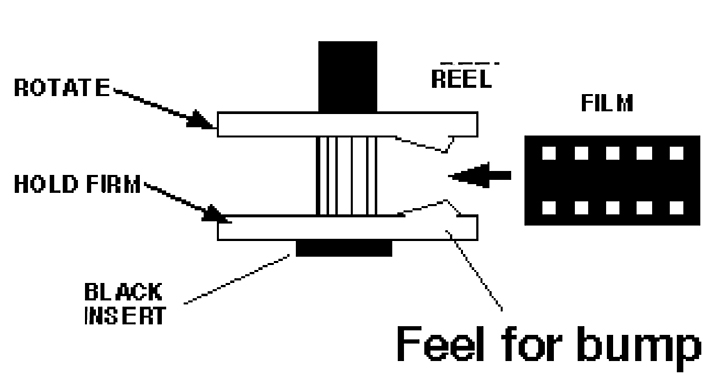
No kidding, this really is the hardest part…it just takes a little practice!
As you already know, film is highly light sensitive so loading the film from roll or cassette into the tank MUST BE DONE IN TOTAL DARKNESS.
Once loaded and the lid is on properly, you can then turn the lights on and continue…the inital difficult part for beginners is getting the film onto the spool, you’ll soon get used to that!
Nik & Trick Tip Number One: Practice loading in daylight, then darkness with a length of duff film
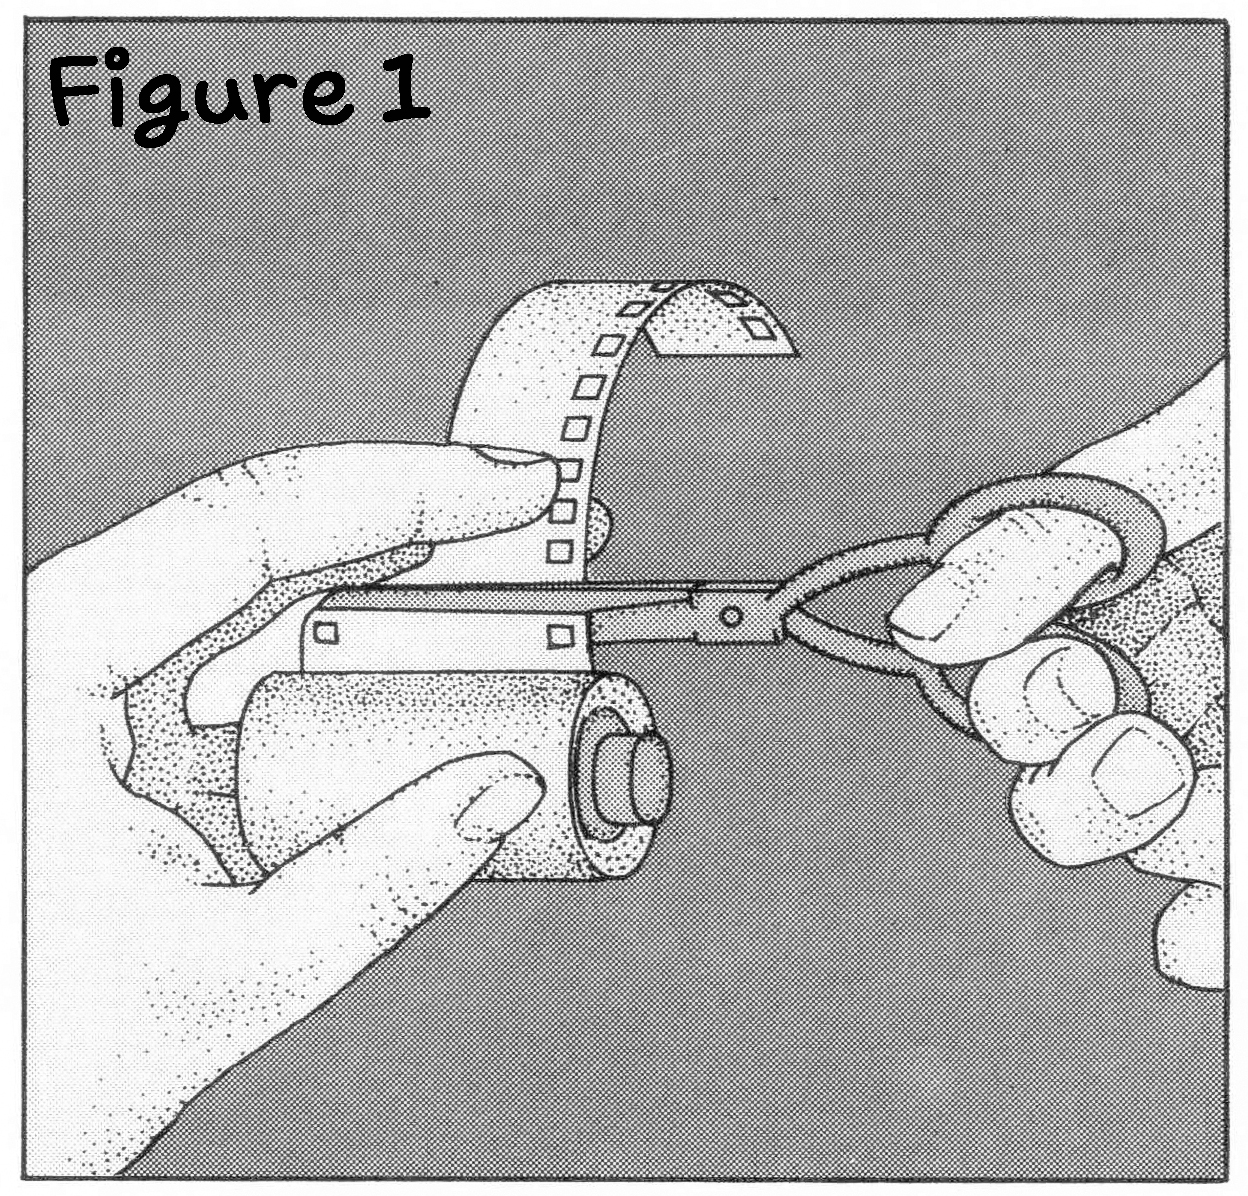
Below are some pictorial steps, figure 1 showing 35mm having the leader trimmed ready for loading…it often helps just to chamfer the leading corners to 45 degrees to help for smoother loading.
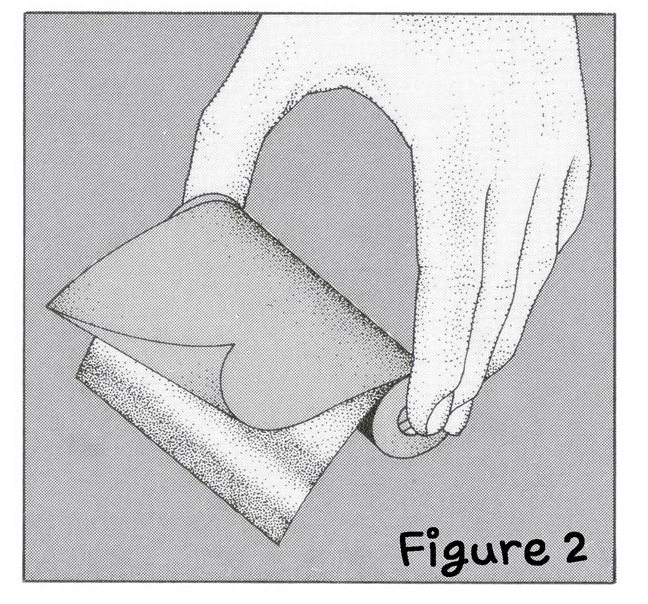
Figure 2, medium format roll film: 127, 120, 620 and 120…these come wrapped in lightproof backing paper from which they must be removed (dead easy!) IN TOTAL DARKNESS…again, chamfering the corners often smooths loading.
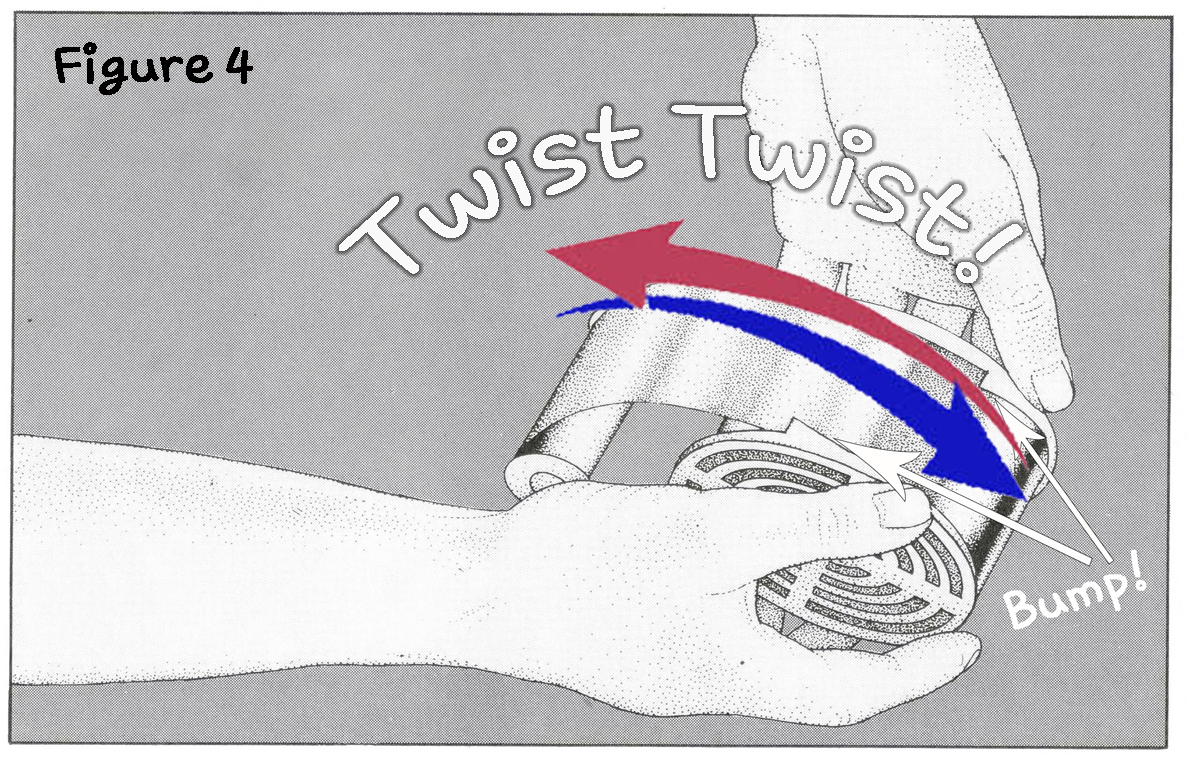
Spirals aka reels, whatever you wish to call them are directional. There are touchy indicators to guide you…take the film leader and as per figure 3 feel for bump! Insert the film under that bump (figure 3 again!) and do the twist as per figure 4!
The film will then move into the grooves in the spiral….nice and easy, no fuss!
We’ll demonstrate in the ensuing video how spirals work, how to set them and the two main type and how to load them….
Nik & Trick Tip Number Two: Make sure that spirals are clean and absolutely dry!!
How about at little video here to just go over some of that? Afterwards we can move onto actually developing a film…the easy part!
Space for video!

DO ALWAYS read the product instructions (vital!!) before you begin also, it is prudent to pay attention to the product Safety Data Sheets
DON’T drink any of the liquids…I am sure we don’t need to tell you this..
lF you have sensitive Skin or skin allergies, please use gloves
DO be careful to not get any of this stuff in your eyes, if you do then rinse straight away with clean running water for a few minutes and then seek medical advice, just in case…
But most of all DO use common sense at all times!!
Three Steps to Heaven…
(Well, it’s four actually but let’s not be picky!)
Later, with the BelliniFoto C41 kit you’ll see that processing colour isn’t that much more difficult…For beginners it’s best to start with black and white and it’s a doddle!
First of all we need to establish a development time….very easy, goto the Massive Dev Chart!
Nik & Trick Tip Number Three: You’e going to get hooked on this…do support MDC by purchasing their mobile app
There you will quickly see that there’s almost every film, cross referenced with every developer…so let’s presume, by way of example, you’re starting with a roll of Ilford HP5+ and have bought the kit with one of the finest developers for it: BelliniFoto Hydrofen…
Using their website, Massive Dev Chart gives us the following:
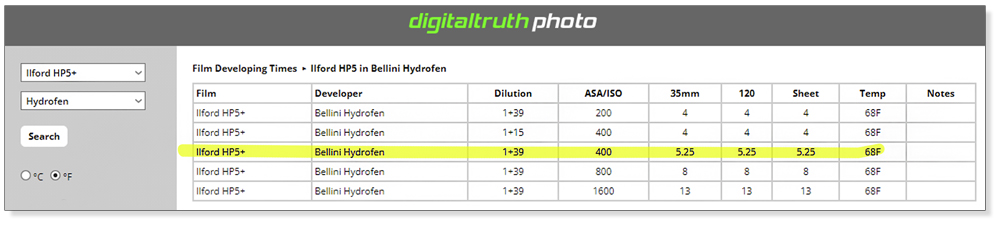
You have shot your HP5 at 400asa so we’ve highlighted the correct time….(the other times shown are options for different strengths of this developer and for manipulating film speed)
So we now know the mixing ratio, in a Paterson tank this works out as 300ml for each 35mm film, 400ml for a 127 and 500ml for a 120 roll…(info shown on the bottom of the tank), we also know the required temperature.
We then take that final required volume and divide by 40 (1+39) to give the amount of developer needed: 7.5ml for each 35mm, to 12.5ml for every 120.
Measure out that volume with the syringe in the kit then make it up to that final volume with tap water at 20c…there’s so little developer used you should end up with the correct temperature.
Nik & Trick Tip Number Four: If the temperature isn’t right then stand your graduate in a jug of warmer or cold water to temper it
It’s wise at this point to also make your stop bath ready, I guess we should tell you to use a stop bath but to be honest, we just use a wash…and have your fix ready also. Having these ready negates the need for panic down the line! 😉
Good advice here is to ensure that they too are within a few degrees of 20c in order to avoid reticulation (you can look that one up!)
When all three fluids are ready…
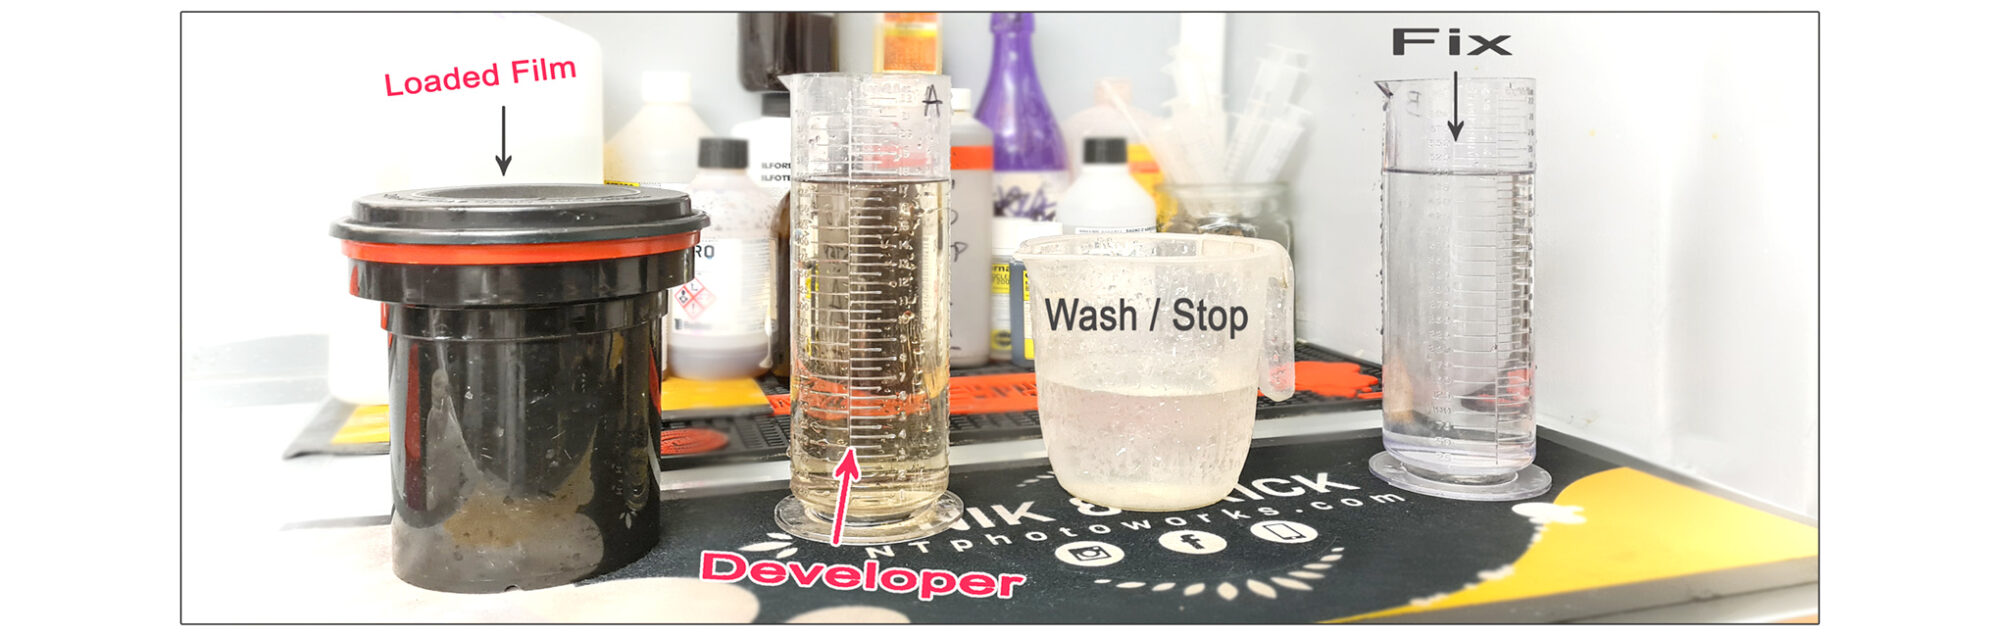
Pour your developer into the tank and set off the timer!!
You are now committed!
As soon as all the developer is in the tank we need to agitate it in order to get fresh dev quickly and evenly over the whole film…up end the tank for the first 30 seconds continuously.
To maintain even and consistent development you must agitate again…five seconds or five inversions every 30 seconds thoughout the full time.
I also agitate constantly for the final 20 or 30 seconds….Dad taught me that when I was nine years old, been doing it since…so there!
At the end of the 5 minutes and fifteen seconds in this case, quickly pour out the developer and then add your wash or stop….for wash, I use 20 to 30 seconds again.
Pour that away and quickly pour the fix in and then agitate continually for about half a minute….and here comes the magic part…you can now remove the lid and check that you have photographs! Dont forget to put the film back into the fix after you have inspected it!
Also, reels can move up the centre column so you can ensure that they are fully submerged in the fix, we don’t agititate fix like we do developer so this is actually quite important making it Nik & Trick Tip Number Five!
How long should I fix film for?
It’s a little technical but not that much!
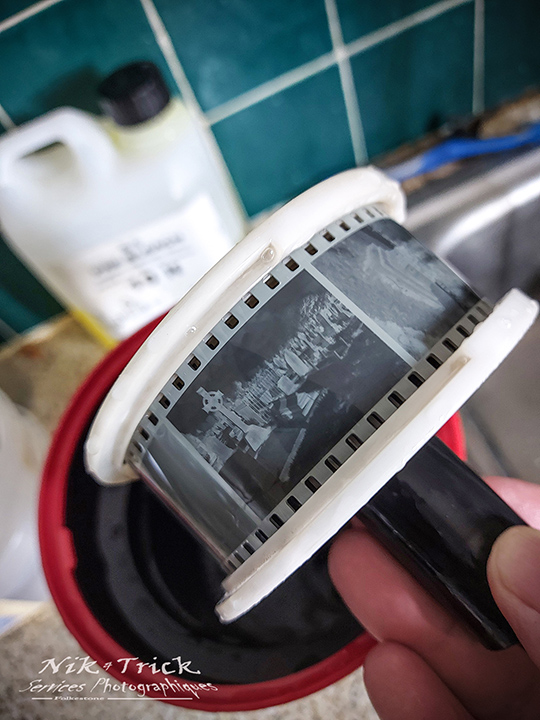
What you cannot see it that whilst film is developing, it is not clear…in fact it’s milky white as you can just make out in the photo to the right.
Film fix is also a clearing agent which provides us with a brilliant rule:
A film is fixed at double the time it takes for it to clear…simple right?
Fresh fix will clear a film nearly immediately…does that mean it’s done?
No, go for four or five minutes to ensure proper fixing…
We save and reuse fix…and as it gets used it will deplete so the clearance time will get longer and longer…
So we can actually use this to monitor the condition of our fix!
So…if after ten or twelve minutes that film is still milky white…then renewing your fix has been overdue for a while!
A couple of noteworthy variables before we wash and finalise the deal!
Some films, usually 120 rolls by Foma, Rollei and Shanghai have an extra layer that can be removed before adding developer…it’s no biggie but entertaining to see the colours that come out!
Just pre-soak in 20c water for a minute as your first step.
Fixing…the rules are there but those vary a little too…some films like HP5+, Delta etc. like a bit longer in the fix anyway. HP5 for example is very purple until properly fixed there are varying and plentiful opnions out there regarding what to do with certain films but as long as you don’t fix for hours on end you should be just fine. Don’t fret!
..and finally!
Okay it’s fixed…return that to your storage bottle and wash whats left out of the film!
If you’re using a force washer then go with that product’s guidelines, if not then you need to wash in the tank using running water for about 15 to 20 minutes, emptying and letting it refill a few times. Photo chemistry is heavier than water and needs pushing up and out the top!
To finish then….a good PhotoFlo or wetting agent. Our preference is Ornano Imbibente, it’s given us immaculate films since we took it into stock but there are others by Ilford, Adox, Kodak, BelliniFoto
Just dip and dunk you films into one of those for half a minute and then hang to dry!
Nik & Trick Tip Number Seven: Film emulsion when wet is soft and can be scratched very easily. ONLY handle wet films by the edges or away from the image areas
Nik & Trick Tip Number Eight: Run your shower for five mins to remove dust from the air then hang your films to dry there!
And that…is all there is too it. Why all all the worry?
I guess the last things we ought to mention…firstly, if you’re not sure then please, just come and ask!
There’s are things like chemical disposal: all we can say on this is that officially you should approach your local authority for guidance. They are in general costly or unhelpful but:
Photographic chemistry has come a long way, it’s cleaner than ever, safer than ever, there are much more vigourous products under your kitchen sink, stuff designed to kill even!
Many of the ingredients qualify for the warning squares just by being present…they are present in very small quantities as a rule, many of those that generate the biggest scares are actually used in such things as skin creams.
So we hope that adds some perspective for you….if green your main concern then we would recommend the fantastic BelliniFoto Eco-Film Developer and FX-100 fix for best assurance.
The final thing we should cover in brief is archiving your negatives….they are precious, a record of the world that we inhabit, look after them.
We have a range of goodies to help with this, our preference, is glassine, which is acid free and had kept my family archive in tip top condition for decades….click here to see what we stock.
Once you have black and white under control…we’ll show you how to do colour….it’s equally easy!
C41 Colour Processing made easy with the BelliniFoto C41 kit and Nik & Trick!

Sign up for our newsletter…scan or click the QR

What can I say but thank you so much for writing and sharing this.
As I try to get back into shooting film yes I am guilty, I’ve been on YouTube and various groups which are comprised of conflicting information and so called expert opinons on how to do things that are just so misleading.
This, well it’s just so straight forwards and plain and simple and easy.
Thank you so much